

Tip 1: How to Display the Copyright Year Dynamically in Elementor
This article shows how easily you can dynamically display the copyright year in Elementor. Applying this tutorial will anticipate a wrong year on your copyright statement in case you forget to update it. It can also maintain your website’s credibility because your copyright year is constantly updated.
To display the year dynamically, drag the title or text editor widget (or any other widget which supports dynamic tags) to where you want it to be displayed. In our example, in the footer part of the website along with the copyright statement.
We want to include the following text with the year always displaying the current year:

In the widget, click the dynamic tags icon next to the text field and select the Current Date Time option from the list. Next, click on Current Date Time to go to Settings and make the following changes:
- Date Format: Custom
- Custom Format: Y
Finally, go to the Advanced section to add the desired text. In our example:
- © (with a space in the before field)
- Alex Design Lab. All rights reserved. (with a space in the after field)
This is it. Publish or update the page or template and you can celebrate the new year now in peace 🙂
Tip 2: Hide ReCAPTCHA
Google reCAPTCHA v3 is an effective way to protect your WordPress website forms from spam. Unfortunately, the reCAPTCHA badge is annoyingly visible on all your website pages. This article shows how to hide the reCAPTCHA badge from your website easily, follow the instructions below.
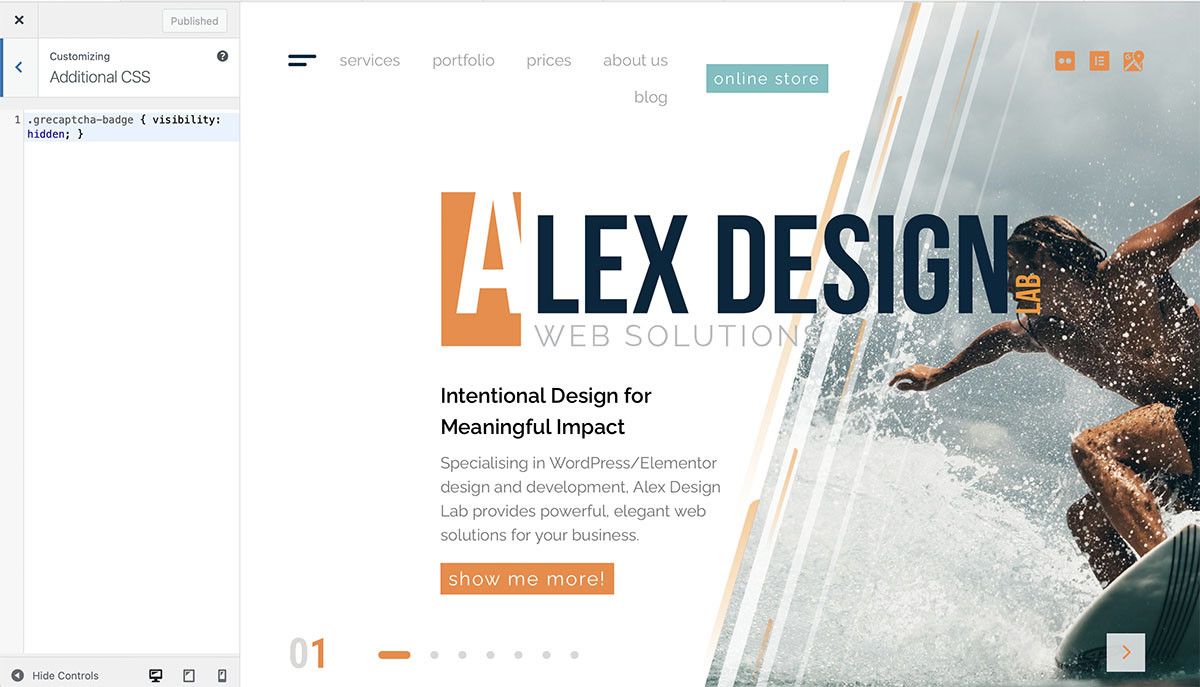
In your WordPress dashboard, go to Appearance and Customizer. Click Additional CSS and add the following code:
.grecaptcha-badge { visibility: hidden; }
Save and preview in frontend. The badge should now be hidden from your website.
According to Google, you are obligated to add a disclaimer in connection to your forms if you hide the reCAPTCHA v3 badge:
“You are allowed to hide the badge as long as you include the reCAPTCHA branding visibly in the user flow. Please include the following text:”
This site is protected by reCAPTCHA and the Google
					<a href="https://policies.google.com/privacy">
    Privacy Policy</a> and
<a href="https://policies.google.com/terms">
    Terms of Service</a> apply.
Tip 3: Disable All WordPress Updates
It would be best to disable all automatic updates on your website, including WordPress, Theme and plugins and do it manually in a controlled environment. It often happens that something goes wrong during the updates, and it might affect the website, even brake the design. I usually manually update my websites and clients’ websites once a month and test them properly afterwards.
There are two ways to disable all updates: by adding code to your wp-config.php file:
define( 'WP_AUTO_UPDATE_CORE', false);
or using a plugin, for example, Disable all WordPress Updates.
Remember that regularly updating WordPress, plugins, and themes is crucial for the security, performance, and functionality of your website.
Tip 4: PHP Memory and Maximum Execution Time
The more Elementor 3rd party plugins installed on your website the more assets will be loaded into your editor page and the more time it takes to load all those assets. To improve editor load and update speed, you can increase PHP Memory Limit & Maximum Execution Time.
First, check your PHP Memory by navigating to Elementor and System Info in your WordPress dashboard. If it is less than 512 Mb, we recommend increasing it by following the steps below:
Using FTP or other means, access your wp-config.php file, located in the root directory of the WP website.
Add this line at the very end of the code to increase the Time Limit to 300:
set_time_limit(300);
Add this line just before the line that says, “Happy publishing”:
define('WP_MEMORY_LIMIT','512M');
Save changes to wp-config.php file and go to Elementor and System Info to ensure that PHP configuration has been updated.